Drawing an Arrow with Pillow
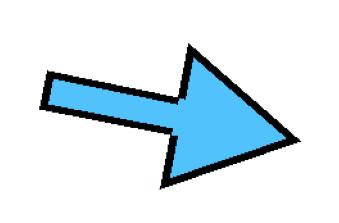
While writing my previous blog post, I created the visuals I needed using the Pillow library inside a Jupyter notebook. The hardest part was drawing an arrow between two points with a fixed thickness, different colors for its fill and outline, and a triangle tip whose size I could control. Because of that, I wanted to share the math behind this in a separate post, along with the Python code.

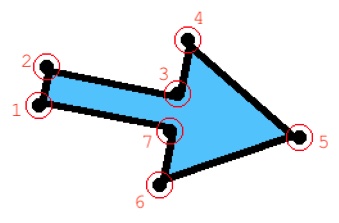
First, let’s write a function that calculates the math behind this arrow independently from the Pillow library. As shown in the image below, the arrow we’ll draw consists of 7 points. In most drawing libraries, a polygon is simply defined by a list of points in the right order. Each point is represented by an (x, y) coordinate pair. So, in the end, our function should return 7 such points, each containing two numbers: x and y.

In the image above, I marked these points with red circles and numbered them. The numbers follow the order in which the points will appear in the polygon list, to avoid any confusion.
You’ve probably noticed that the polygon is made up of a rectangle and a triangle. Not every arrow has to be like this, but to keep things simple, we’ll stick to this structure for now. Later, we can extend the function to support different inner angles if needed.
Let’s define our function with the following signature:
def calculate_arrow_polygon(
    x1: float,
    y1: float,
    x2: float,
    y2: float,
    arrowhead_height: int,
    tail_thickness: int,
) -> tuple[tuple[float, float], ...]:
    """
    Calculates the 7-point polygon representing an arrow with a rectangular tail
    and equilateral triangle head.

    Args:
        x1: Tail center x-coordinate.
        y1: Tail center y-coordinate.
        x2: Arrow tip x-coordinate.
        y2: Arrow tip y-coordinate.
        arrowhead_height: Height of the equilateral triangle arrowhead.
        tail_thickness: Width of the rectangular tail.

    Returns:
        A tuple of 7 (x, y) points forming the arrow polygon.
    """
Points 1, 2, 3, and 7 in the image belong to the rectangle. Points 4, 5, and 6 belong to the triangle.
The x1, y1 parameters given to the function by the user will correspond to the center point of the tail end of the arrow i.e., the midpoint between points 1 and 2.
Therefore, we can calculate points 1 and 2 using a bit of trigonometry, centered around the point (x1, y1).
The (x2, y2) point directly corresponds to point 5 in the image, which is the tip of the arrow.
Let’s begin the calculations. To do that, we first need to understand what a unit vector is and why it’s essential in our case.
Unit Vector
A unit vector is a vector with a length (or magnitude) of exactly 1. It represents only a direction, without any scaling. In our scenario, we use a unit vector to describe the direction from the tail of the arrow (centered at point (x1, y1)) toward the arrowhead (point (x2, y2)). By converting this direction into a unit vector, we ensure that any further operations like scaling or rotation are based solely on direction and not on distance.
We also calculate a perpendicular unit vector; a unit vector that is rotated 90 degrees from the original direction vector. This perpendicular vector is essential because we use it to shift points left and right from the center line of the arrow to define the rectangle’s width (i.e., to find points 1, 2, 3, and 7). Without the perpendicular direction, we wouldn’t be able to define the sides of the arrow shaft.
In summary:
- The unit vector gives us the direction along the arrow.
- The perpendicular unit vector gives us the direction across the arrow (left/right). Both are crucial to accurately position the corners of the rectangle and the triangle using trigonometric offsets.
Here is the Python code to compute both the unit vector (direction of the arrow) and the perpendicular unit vector (used to offset left/right), with explanations in the comments:
import math

def unit_vector(x1: float, y1: float, x2: float, y2: float) -> tuple[float, float]:
    """Compute the unit vector from point (x1, y1) to point (x2, y2).

    Args:
        x1 (float): X-coordinate of the starting point.
        y1 (float): Y-coordinate of the starting point.
        x2 (float): X-coordinate of the ending point.
        y2 (float): Y-coordinate of the ending point.

    Returns:
        tuple[float, float]: Unit vector (ux, uy) in the direction from (x1, y1) to (x2, y2).
    """
    # Step 1: Compute the direction vector from tail (x1, y1) to tip (x2, y2)
    dx = x2 - x1
    dy = y2 - y1

    # Step 2: Compute the length (magnitude) of this vector
    length = math.hypot(dx, dy)  # Equivalent to sqrt(dx**2 + dy**2)

    # Step 3: Normalize the direction vector to get the unit vector
    ux = dx / length
    uy = dy / length

    # Step 4: Return the unit vector as a tuple
    return ux, uy

def perpendicular_vector(ux: float, uy: float) -> tuple[float, float]:
    """Compute the vector perpendicular to a given unit vector, rotated 90 degrees counterclockwise.

    Args:
        ux (float): X-component of the unit vector.
        uy (float): Y-component of the unit vector.

    Returns:
        tuple[float, float]: Perpendicular unit vector (-uy, ux).
    """

    # Rotating the direction vector 90 degrees counterclockwise:
    # (ux, uy) --> (-uy, ux)
    return -uy, ux
From Vectors to Arrow Geometry
Now that we have both the direction unit vector (which we’ll call ux, uy) and the perpendicular unit vector (px, py), we can begin to calculate the seven points that form our arrow. Every point will be derived by starting from a center position (like the midpoint of the tail or the base of the arrowhead), and then moving either along the arrow direction (using ux, uy) or across the arrow (using px, py).
Let’s break it down:
- The tail rectangle has two long sides. We find these by shifting the tail midpoint
(x1, y1)left and right using the perpendicular vector (px,py) scaled by half the tail thickness. - The base of the arrowhead is placed
arrowhead_heightunits behind the arrow tip, by moving backwards along (ux,uy). - The triangle head is an equilateral triangle, so we can compute its width based on its height using the formula for an equilateral triangle:
half_base = height / sqrt(3) - The triangle base corners (points 4 and 6) are computed by shifting left and right from the arrowhead base center using
px,py.
By combining these geometric translations, we can locate all seven points of the arrow.
Final Code
Now that we’ve explored the vector math, understood how to shift points along and across the arrow, and seen how to compute the tail and arrowhead dimensions, it’s time to assemble everything into two functions.
import math
from PIL import Image, ImageDraw


def calculate_arrow_polygon(
    x1: float,
    y1: float,
    x2: float,
    y2: float,
    arrowhead_height: int,
    tail_thickness: int,
) -> tuple[tuple[int, int], ...]:
    """
    Calculates the 7-point polygon representing an arrow with a rectangular tail
    and equilateral triangle head.

    Args:
        x1: Tail center x-coordinate.
        y1: Tail center y-coordinate.
        x2: Arrow tip x-coordinate.
        y2: Arrow tip y-coordinate.
        arrowhead_height: Height of the equilateral triangle arrowhead.
        tail_thickness: Width of the rectangular tail.

    Returns:
        A tuple of 7 (x, y) points forming the arrow polygon.
    """
    # Step 1: Get unit direction vector and perpendicular vector
    ux, uy = unit_vector(x1, y1, x2, y2)
    px, py = perpendicular_vector(ux, uy)

    # Step 2: Base of the triangle is arrowhead_height units back from tip
    # This is also the middle point of rectangle's side touching the triangle
    base_cx = x2 - arrowhead_height * ux
    base_cy = y2 - arrowhead_height * uy

    # Step 3: Calculate Triangle base width
    # h = √3/2 * a --> a = 2*h/√3 --> a/2 = h/√3
    tri_base_half_width = arrowhead_height / math.sqrt(3)

    # Step 4: Tail rectangle corners: points 1 and 2
    tail_half = tail_thickness / 2
    p1 = (x1 + px * tail_half, y1 + py * tail_half)
    p2 = (x1 - px * tail_half, y1 - py * tail_half)

    # Step 5: Tail rectangle corners: points 3 and 7
    # We calculate them from the middle point between those two points that is also
    # the mid-point of the triangle's base.
    p3 = (base_cx - px * tail_half, base_cy - py * tail_half)
    p7 = (base_cx + px * tail_half, base_cy + py * tail_half)

    # Step 6: Triangle base points
    p4 = (base_cx - px * tri_base_half_width, base_cy - py * tri_base_half_width)
    p6 = (base_cx + px * tri_base_half_width, base_cy + py * tri_base_half_width)

    # Point 5 is just the user input
    p5 = (x2, y2)

    # Step 7: Convert points from float to int and return the polygon
    return tuple(map(
        lambda p: (int(round(p[0])), int(round(p[1]))),
        [p1, p2, p3, p4, p5, p6, p7],
    ))


def draw_arrow(
    canvas: Image.Image,
    x1: int,
    y1: int,
    x2: int,
    y2: int,
    outline_thickness: int = 3,
    arrowhead_height: int = 10,
    tail_thickness: int = 8,
    outline_color: tuple[int, int, int] = (0, 0, 0),
    fill_color: tuple[int, int, int] = (255, 255, 255),
) -> None:
    """
    Draws a filled, outlined arrow from (x1, y1) to (x2, y2) on the given image.

    Args:
        canvas: The target PIL image to draw on.
        x1, y1: Tail center coordinates.
        x2, y2: Arrow tip coordinates.
        outline_thickness: Outline width in pixels.
        arrowhead_height: Height of the equilateral triangle head.
        tail_thickness: Width of the tail rectangle.
        outline_color: RGB color of the outline.
        fill_color: RGB color of the inside fill.
    """
    polygon = calculate_arrow_polygon(x1, y1, x2, y2, arrowhead_height, tail_thickness)
    draw = ImageDraw.Draw(canvas)
    draw.polygon(polygon, fill=fill_color, outline=outline_color, width=outline_thickness)
Here is a quick and dirty code showing how we can test the above functions in a jupyter notebook using matplotlib:
from PIL import Image, ImageDraw
import matplotlib.pyplot as plt


# Create a blank white image
width, height = 300, 300
img = Image.new("RGB", (width, height), (255, 255, 255))

# Example arrow parameters
x1, y1 = 250, 190   # Tail center
x2, y2 = 50, 150  # Arrow tip
arrowhead_height = 100
tail_thickness = 30
outline_thickness = 6
outline_color = (0, 0, 0)
fill_color = (100, 200, 255)

# Draw the arrow
draw_arrow(
    canvas=img,
    x1=x1, y1=y1, x2=x2, y2=y2,
    outline_thickness=outline_thickness,
    arrowhead_height=arrowhead_height,
    tail_thickness=tail_thickness,
    outline_color=outline_color,
    fill_color=fill_color,
)

# Display using matplotlib inline
plt.figure(figsize=(5, 5))
plt.imshow(img)
plt.axis('off')
plt.title("Test Arrow")
plt.show()
Closing Words
I’ll admit, this isn’t exactly groundbreaking stuff. But for some reason, not sharing it was bothering me enough to keep me up at night. I went down quite the rabbit hole trying to get a clean arrow shape using vector math and ChatGPT. After spending that much time, it felt like a waste not to write it up and share it.
If you’ve made it all the way here, thanks for reading. Hope it was at least a little useful or at the very least, entertaining. Take care and see you in the next weirdly specific problem.